
WIN ! your mortgage, student loan, dream vacation or whatever. Details below and on every bottle of Liqui-Fire!
|
WIN ! your mortgage, student loan, dream vacation or whatever. Details below and on every bottle of Liqui-Fire! |
Corporate Bullying and Criminals in Canada
Alliance-Rona Rona Stores Recochem Inc.
Windshield Washer Fluid Class Action Suit Early Tire Wear S.C. Johnson
Corporate Affiliations and Store Ownership
Competition Act
My Opinion
|
How to design and build a Waterfall and/or Garden
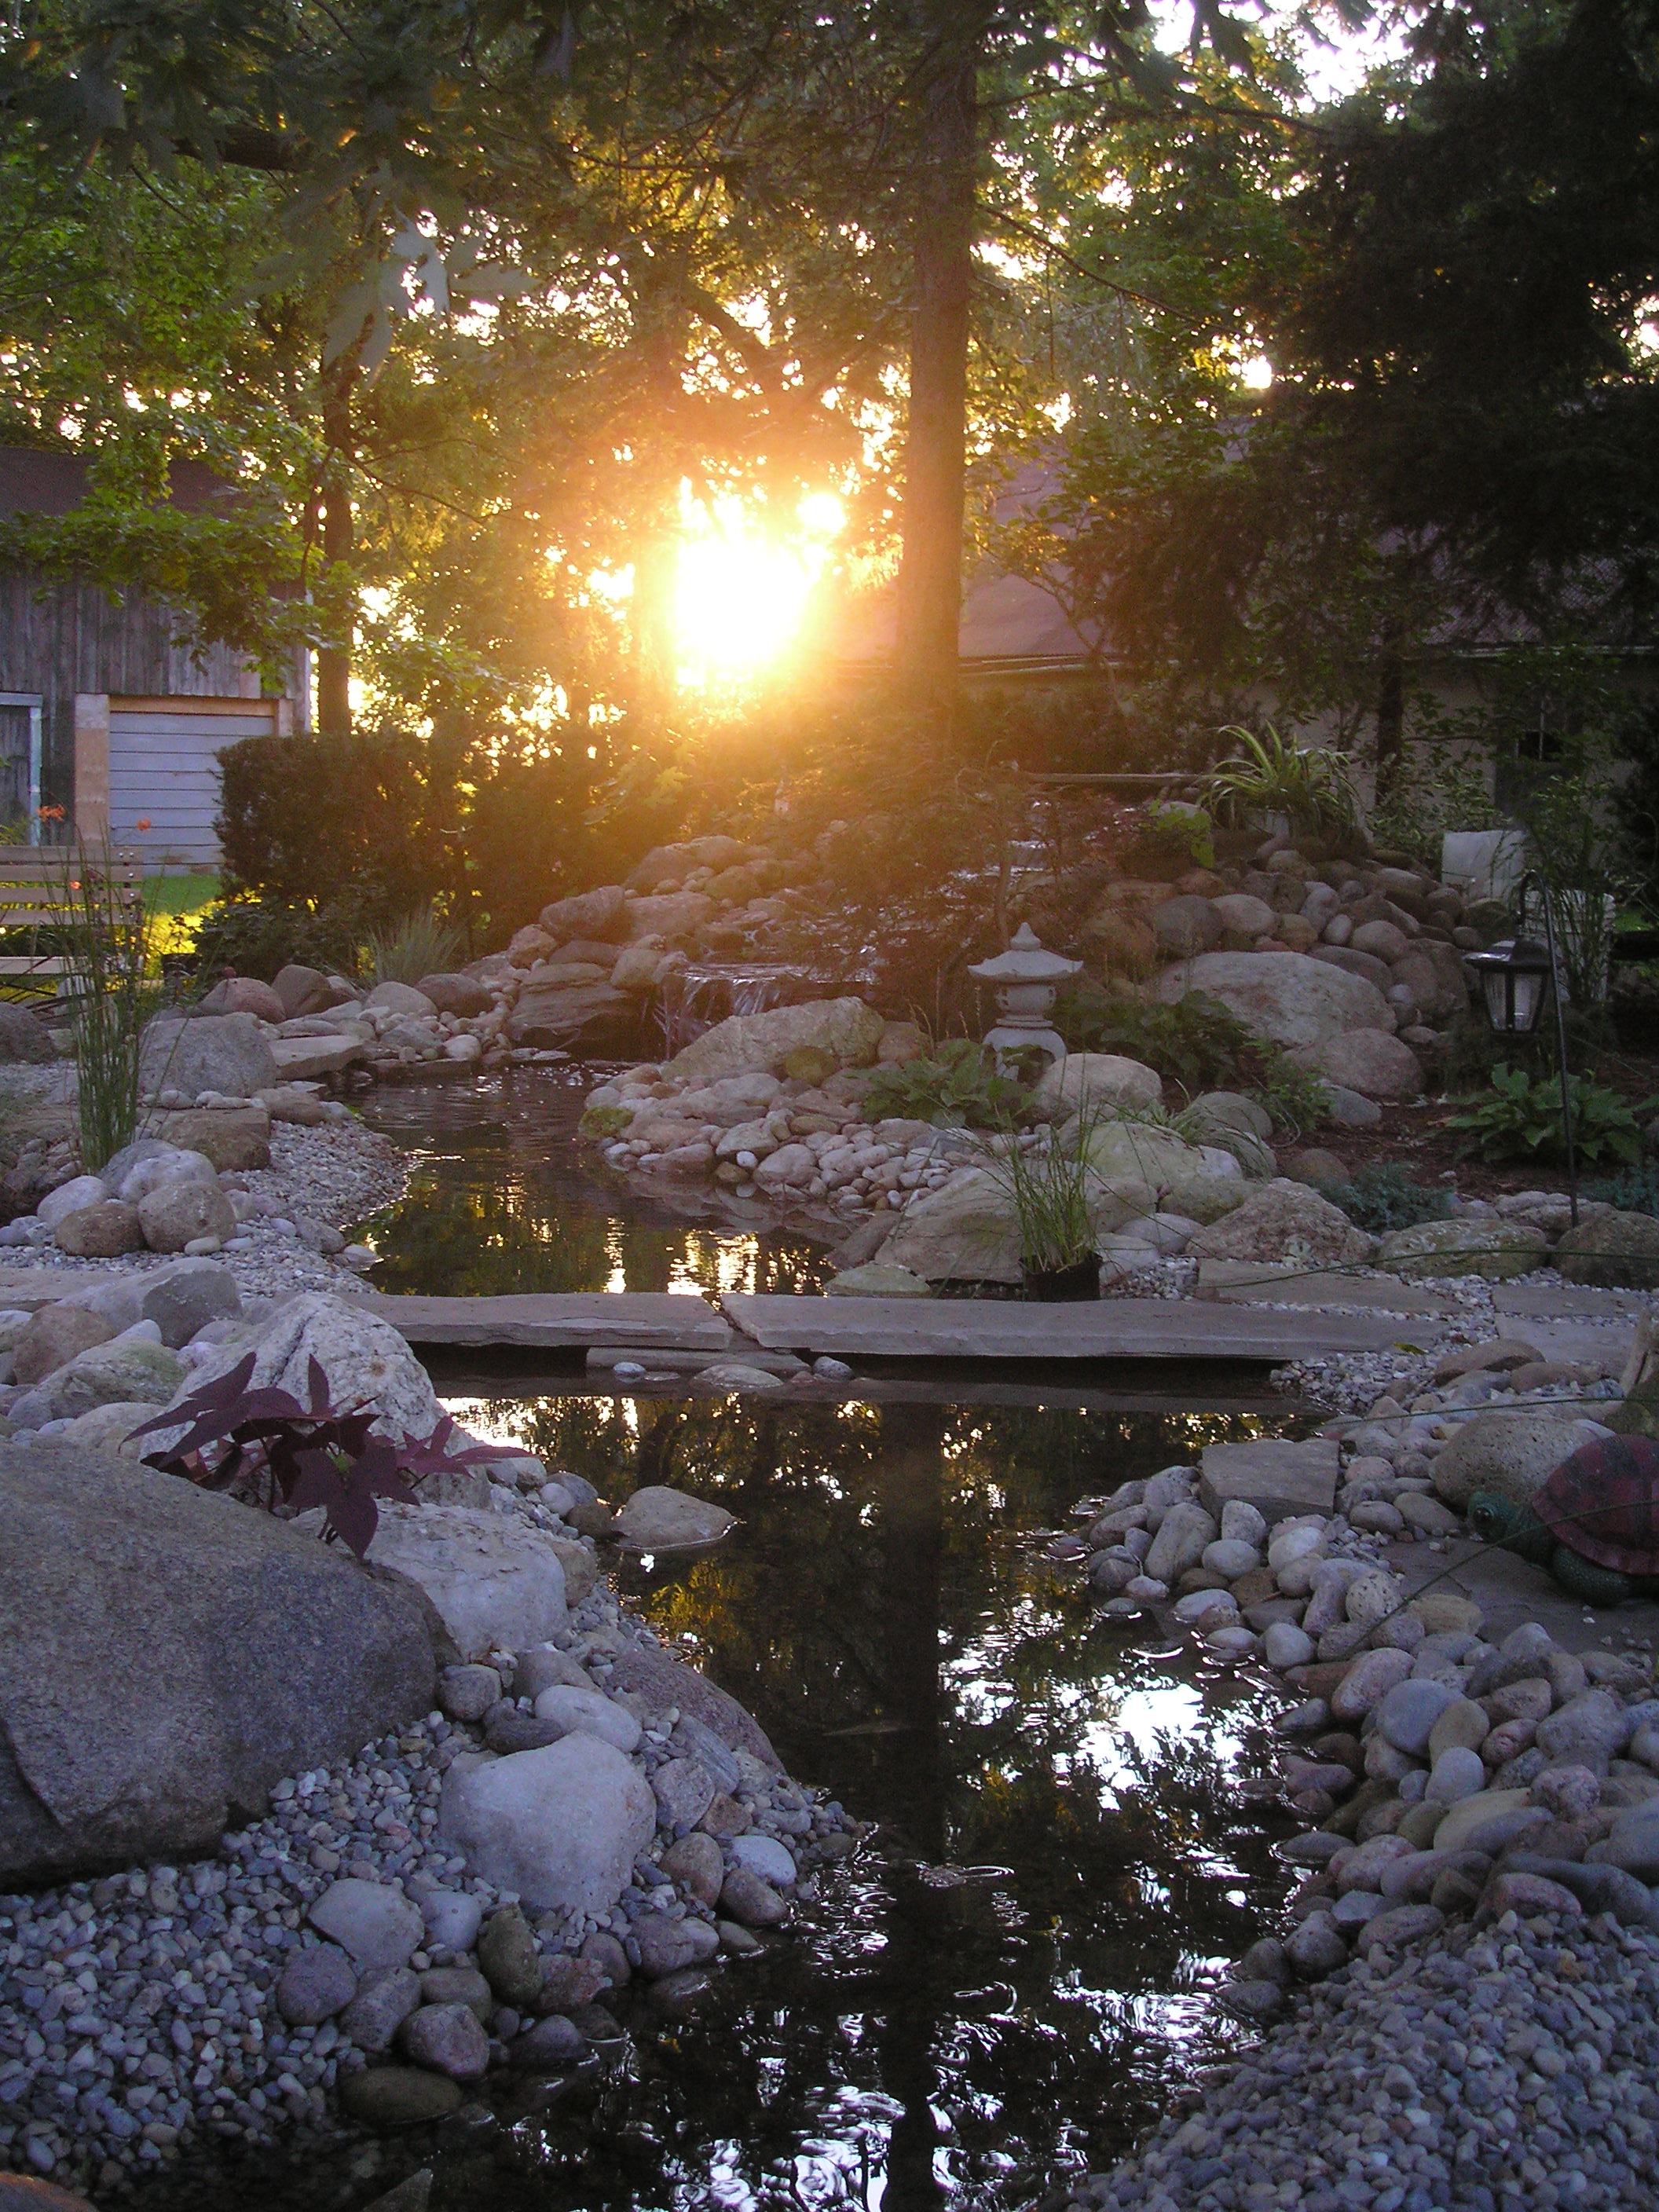
Planning is everything when it comes to building your waterfall and/or garden. Do you think the sun just happened to set in the perfect spot of this waterfall feature? Or do you think the sunrise just happened to rise and reflect over the lower waterfall in this double waterfall, double pond and over 35' creak. No. I stood and looked at things over and over. I spent a lot of time looking at things at the end of the day noting where the sun set and where the sun rises. There is seating in the right location so that these views exist. PLAN and when you are done, check your plans again. So you would like to have your own waterfall and/or a beautiful garden. They don't just happen and the best usually come with a lot of trial and error and years of transformation. There are many tricks and methods that can be used by proper planning. PLANNING Now that you have decided to actually build a waterfall or garden there are a few things you should do. Make certain you have shopped around and know your cost. Although the finished result has rocks, stones, mulch, plants, and a few other things make sure you have set aside enough money for the job. You should take some time to view photos online of some of the thousands of waterfalls. View both those that are natural as well as some that are man made. Once you have picked out a dozen or so of your favorite photos take time to study them. With each of these photos pick out EXACTLY what it is you enjoy about the photos. Remember to eliminate the parts of the photo that will not be in yours. E.g. if there are lots of trees in the photo you like try eliminating them. Print the photo and cut the part that you like out so that the nature that is in the photo is not seen; or you can do it in a computer program if you have the skills. Once you have cut out all the pieces of each of these photos you can now effectively begin to design your yard. Take a photo of the area of your yard that you are wanting to designate as your waterfall and/or garden. Manipulate the cut-outs of your favorite photos until you have a design that you are happy with. You can always change your waterfall and/or garden easily on paper or in the computer. Many waterfalls are not built properly and therefore the end result is wasted money, wasted time and an unused enormous amount of work. And they do take a lot of work. Remember as well that a waterfall uses water and electricity. These are both operating expenses that many people don't consider. To design the perfect waterfall and/or garden use these tricks. Take a chair and sit in your yard. Notice where the sun rises and where it sets. If the sun doesn't set for you in the right location remember there are many artificial light sources that can be used to make yours look spectacular. Next thing is to take your plans, a chair, and a bunch of tarps or blankets and towels to your new area. You are planning to build into your personal retreat so take time at this point to play with the layout as per your plans. Lay the tarps or blankets and towels into the planned area. Push or pull them into the desired shape that pleases yourself. You have to use some imagination as you are doing this. The tarps or blankets and towels represent the areas that will be filled with water as well as the natural shoreline. The areas that are left are important as you will need to be able to walk around to service your waterfall and/or garden. Also there should be enough space for seating, paths or walkways, etc. As you can see a magnificent waterfall/garden do require space planning for yourself as well as for plant growth. Stake the ground or spray paint the areas selected for specific uses as per your plans. BREAKING GROUND The first step as with any form of construction is to install your services. Things like electricity, water, and sewer are all needed to be dug and installed before anything else. Make sure that these are dug deep enough in the ground to avoid further complications. Use an industrial outdoor GFI receptacle and outdoor switch. You can find these at an electrical supply company. You won't find them at your local Home Hardware Store. It is a good idea that you install electrical receptacles in a few locations. This will prevent power cords from being dragged across your finished waterfall and garden. Water supply should be installed below the frost line to prevent them from freezing up. To avoid a freeze up or if they do freeze use Liqui-Fire Pipe Thaw by Woodsmans International. It's safe for you and your water. Be sure to trench the path for the water being pumped to the waterfall head. It's best that this is also a couple of feet deep. You don't want to dig for a plant and find you've hit your pump line. I have found it best to determine your pump location and waterfall head location and then dig a trench 2 feet deep. Purchase a continuous length of "Big-O" non-perforated pipe that is at least 5 feet longer then you need. Tie a heavy wrench onto a piece of rope or string and insert it into the end of the "Big-O" pipe. By raising that end, you can get the wrench to pull the rope through the pipe. Be sure to secure the ends of the rope or string onto the outside of the pipe as you will need this rope or string later on to pull the pump pipe through it. Lay the pipe into the trench and fill the trench about 2-3 inches at a time. Stomp or tamp down the fill in your trench every time you put in a couple of inches of fill. This prevents the finished grade from sinking later on. At this point you are ready to begin and now have a good idea of what you are doing. You should have stakes in the ground and painted your outlines before you start. you have planned out where you will temporarily store your stock piles of various materials to make it easier for you to build. You have located all of your suppliers that will deliver the materials you need. In some cases some of these materials may have been found locally and gathered over months or even years. Things like rocks, driftwood, old carpet and/or under-padding and plants. It's a good idea to wash your rocks before you have water in your new system. This retains all the bright colours of the riverbed rock and helps to eliminate a dirty looking riverbed. When digging the ground make sure you don't leave the finished grade lose packed. Use a tamper and go over it several times to be certain your water features won't sink. It is easier to dig the main creek area down only about 4-6 inches and then scrape off the rest to the finished start grade. The start grade should be at least 6 inches below the existing or finished grade. It is very important that you make your start grade of your creek deep enough. If you don't your stream will appear artificial as it will appear to be above the rest of the landscape. In nature, real creeks run in the ground, not above. You also have to dress the sides of your creek when it's finished and you don't want those rocks to be to far above the water flowing in your creek.
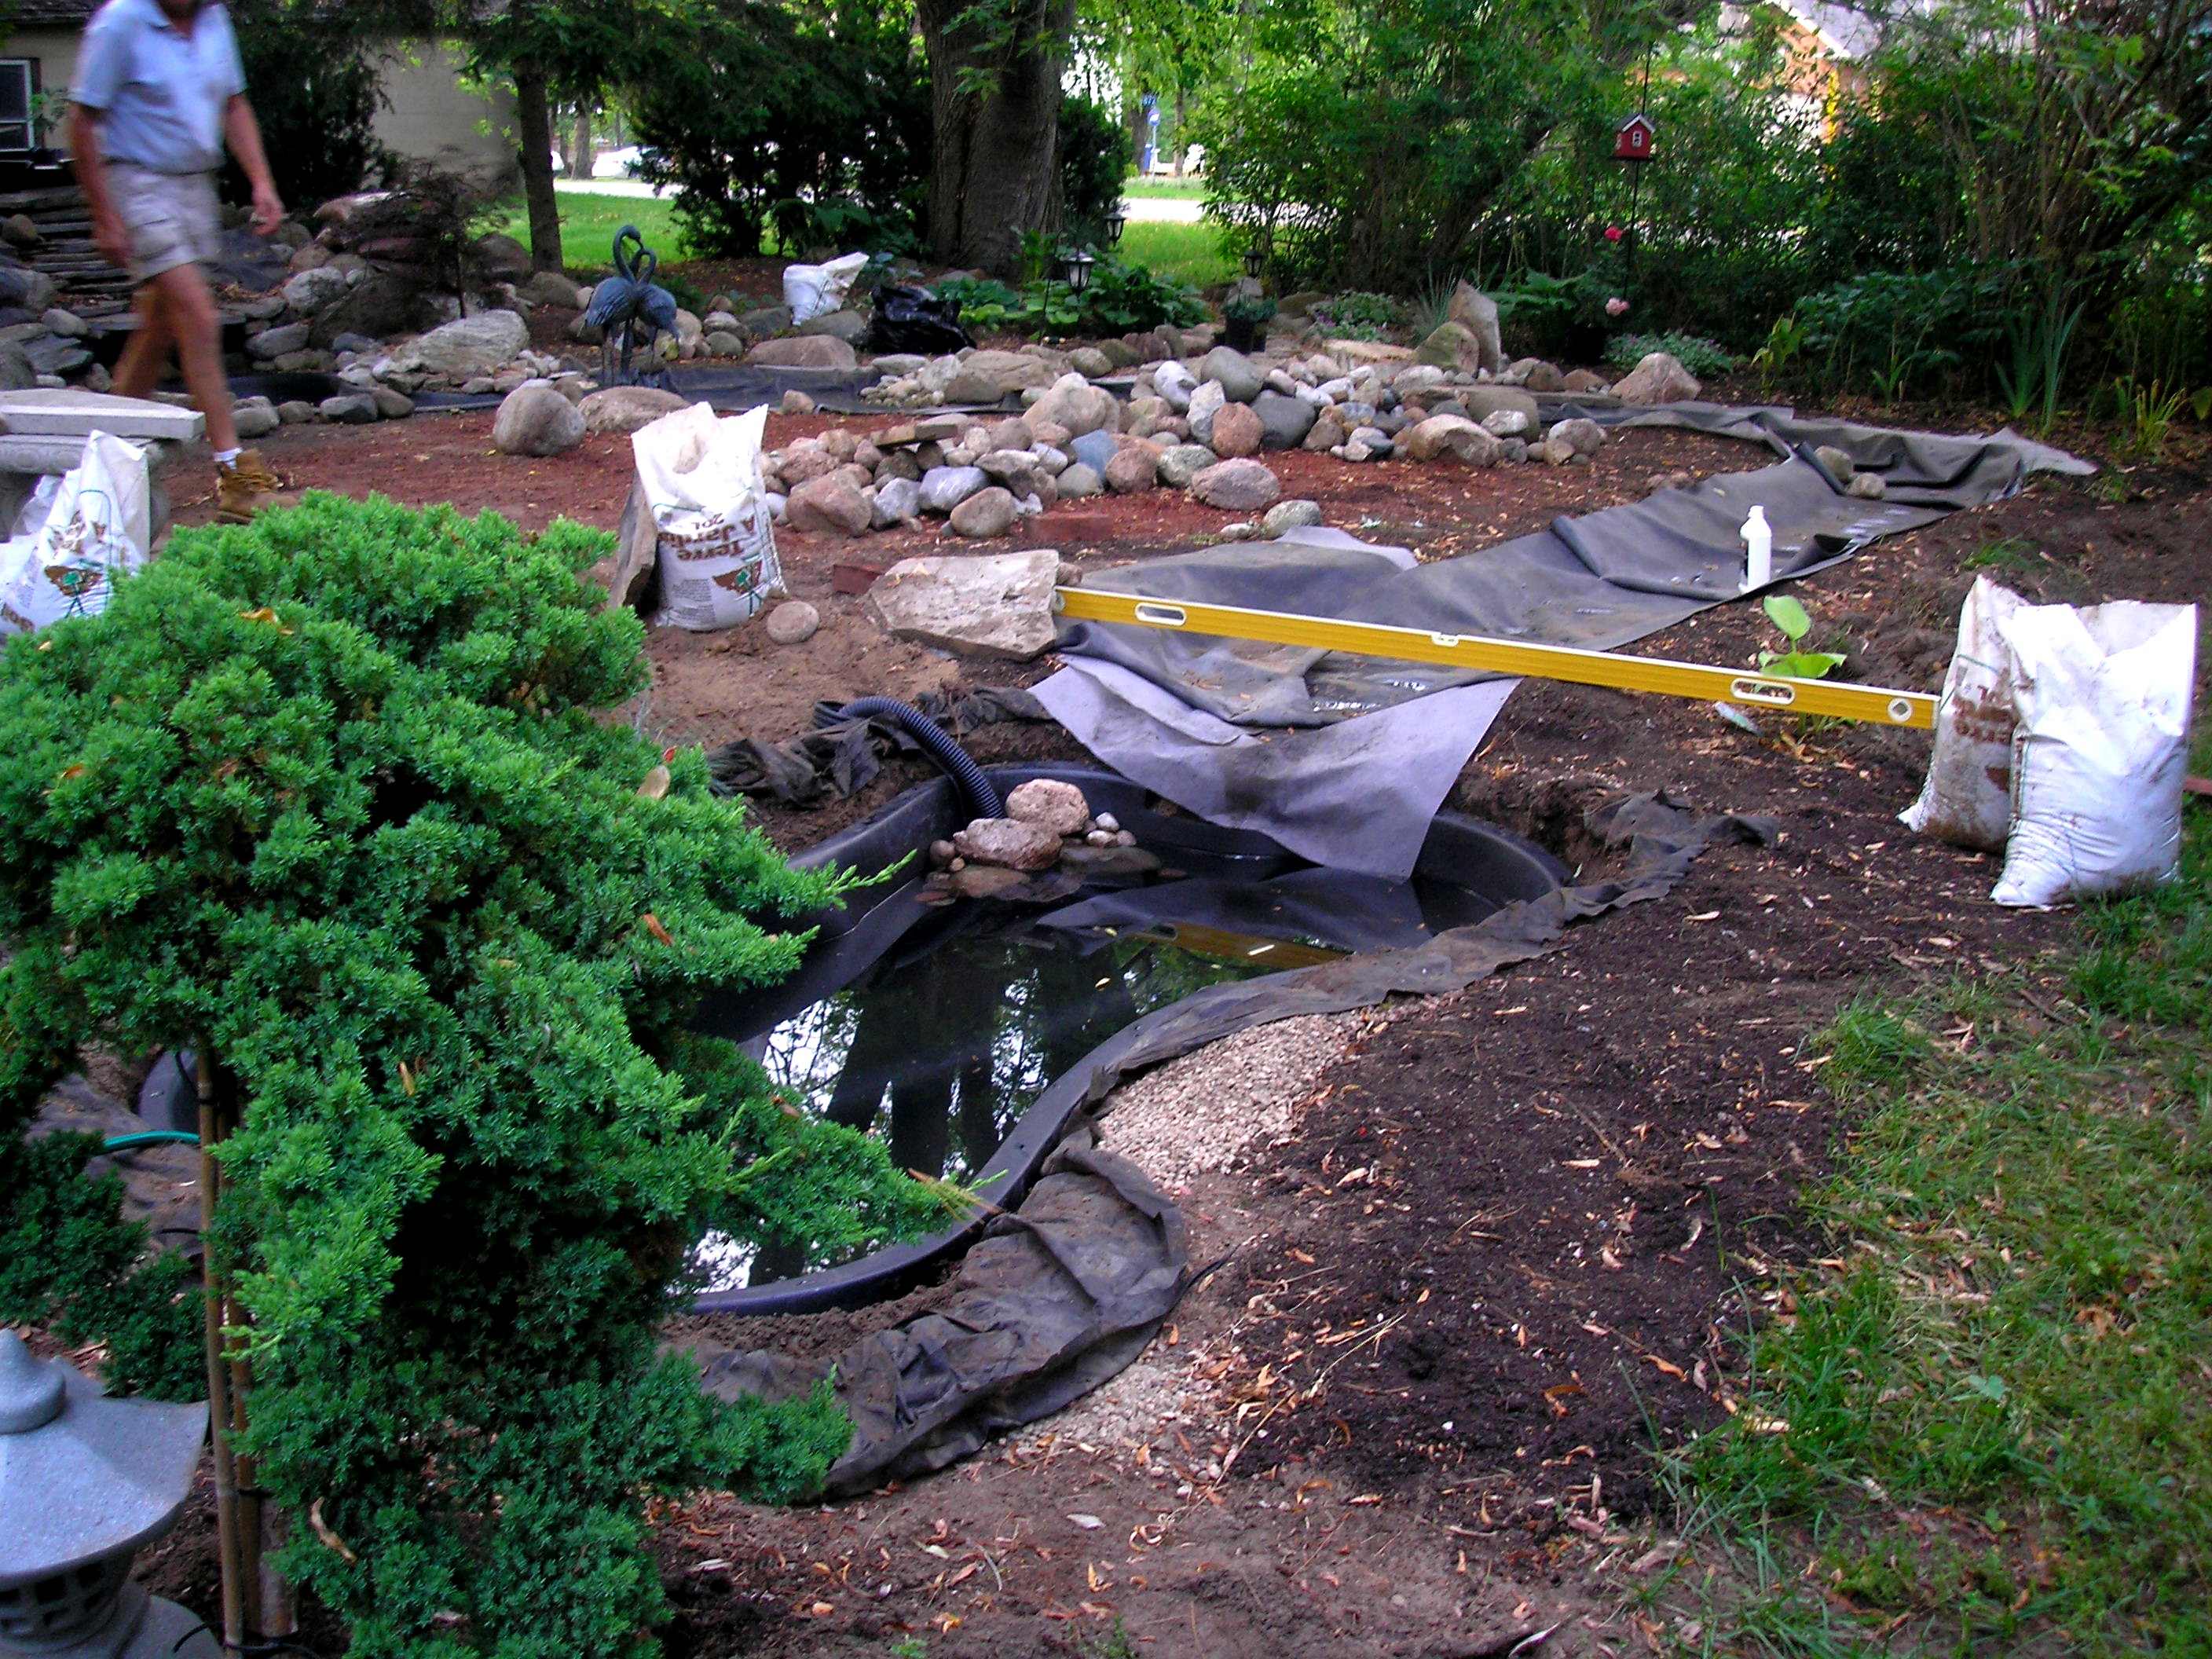
Above you can see most of the rough-in has been done. The electrical has been installed, the pond pump trench is in place and the creek bed is now visible. The ponds were filled with water to help them settle into there final resting position. Any adjustments can still be made at this time. Visible in the lower pond is the pump intake. It was custom made to allow for maximum intake to the pump as well as to save money. This will be discussed a little later. A variety of landscape fabric was used in this waterfall system. The best landscape fabric is the heavy white looking blanket type. The black fabric doesn't prevent weed growth and I personally wouldn't recommend it. PONDS and LINERS Spread about a 1-2 inch layer of sand into all areas where your pond(s) or pond liners as well as your creek bed liner will be installed. Next use old carpet or under padding beneath the creek bed. This is perhaps one of the most beneficial things you can do as it almost guarantees you will not have a leak in your system. Leaks can be extremely costly and are frustrating trying to find. A leak can empty your system over the course of a few hours. You are now ready to lay your rubber membrane into your system. Make sure your rubber membrane is longer then what you need. A couple of curves will eat up the length of the membrane with folds. When you make a bend the rubber membrane gets folded instead of being cut and joined. You can see several folds along the creek bed above. The landscaping will hide every fold later on. Whenever possible use a very heavy rubber membrane instead of the lighter weight membrane. PUMP INTAKE Once you have purchased your pond pump remove the plastic intake cover(s) until you see the threaded pump intake. This should be a 1 1/2 inch tapered pipe thread. Purchase an ABS pipe fitting that will be screwed into the pump. The one end will be threaded and the other end allows for a 1 1/2 inch ABS pipe to be glued into it. Place the pump into your pond and measure the distance between the pump to the far bottom edge of your pond. This tells you the length of 1 1/2 inch ABS pipe that you will need. Cut that length of ABS pipe a few inches shorter. Next drill a series of holes down the entire length of pipe on all sides. These holes are to allow the water to easily enter into the inside of the pipe and be drawn into the pump. Next clean out any debris from the pipe both outside and inside. Take an end cap for 4 inch "Big O" and using a hole saw or a utility knife cut a hole large enough for the 1 1/2 inch ABS pipe to slide through. Glue the drilled and cleaned 1 1/2 inch ABS pipe to the threaded ABS fitting. Slide the open end of the pipe through the hole in the "Big O" end cap. Glue on a 1 1/2 inch ABS pipe cap onto the open end of the pipe. Now use a length of nylon screen and silicon it to the pipe. The screen should wrap the entire circumference of the pipe and come onto or over the ABS pipe cap. Use masking tape to secure the screen in place until the silicon dries. Now silicon the "Big O" pipe cap securely on this assembly. Silicon it inside and outside and use a good amount of silicon. This assembly will be screwed into the pump intake and will be inside of the "Big O" below. Next cut a length of "Big O" pipe a couple of inches longer then the inside 1 1/2 ABS pipe. Again drill holes along the entire length and circumference of the pipe. Clean out all of the debris inside and outside of this pipe. Put on a "Big O" cap. Surround this pipe with nylon screen leaving a few inches at the open end as well as onto the cap. Silicon the cap and screening securely onto this pipe. Tape it and let it dry while sitting nice and straight. On the following day this assembly can be put together. Tighten the 1 1/2 inch screened ABS pipe into the pump intake. Next take the screened "Big O" assembly and slide it over the 1 1/2 inch pipe until it reaches the "Big O" end cap nearest the pump. Force the extra screening inside and secure the outer assembly onto the inner assembly. You now have an intake that prevents debris from entering into your pump and destroying it. WATERFALL(s)
|
|
* Disclaimer: We are not responsible for any misleading information here as it is provided to every Canadian via television, websites, flyers, advertisers, or employees thereof. Availability and prices are subject to change without notice. *
Send mail to
woodsmansdb@hotmail.com
with questions or
comments about this web site.
|